
Tools ~ Classical Vocabulary
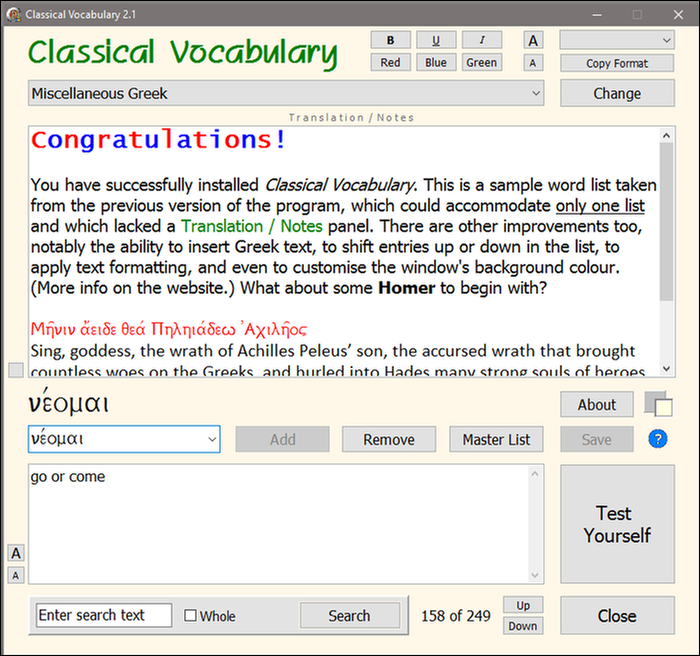
Classical Vocabulary is a program for students and aficionados of Greek and Latin literature. It can be used to maintain catalogues of Greek and Latin word lists in conjunction with translations or other notes.
Features
- Up to 1,000 vocabulary lists.
- Up to 10,000 items per list.
- Random quotations – Greek and / or Latin
- Create, modify and remove lists.
- Add, modify and remove words.
- Master lists for Greek and Latin, separately alphabetised.
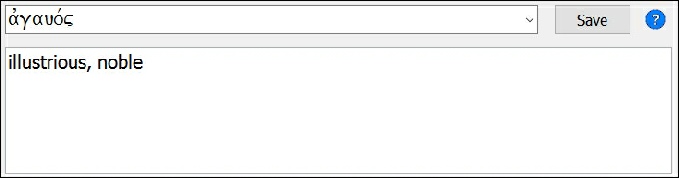
- Insert Greek text in the Translation / Notes panel.
- Move between the words in each list, while keeping the same translation or note in view.
- Shift entries up or down in each list.
- Search for words in the current list, including text in the Translation / Notes panel.
- Self-
testing: click the Test Yourself button. - Text formatting capability.
- Configurable interface (background colours).
Further enhancements to the program are planned. These may include printing and reporting capabilities, startup options, and other customisations.
Requirements
Operating system: Microsoft Windows only.
The SPIonic Greek font must be installed, even if you do not intend adding Greek words.
Initial space requirements are negligible (around 2 MB).
Installing Classical Vocabulary
First download the distribution file ClassicalVocabulary21.zip and extract the contents into a folder of your choice (suggested name ‘Classical Vocabulary’). There are six files:
- ClassicVocab.exe – the main executable program file. You can create a shortcut to this file and place it on the Desktop, or add the file to the Start button.
- SPIonic_Windows.ttf – The Greek font needed to display the Greek characters. Right-
click this file in order to install it on your computer (or use the Windows Control Panel). Bear in mind that this font MUST be installed in order for the program to work. - SPIonic_Keyboard_Map.pdf – how to use a standard QWERTY keyboard to produce the Greek characters. Most of the correspondences are easy and intuitive, but some are not – especially the accents and breathings. (Note that pressing the F1 key, with your mouse pointer in the Translation / Notes panel, will show the SPIonic keyboard mapping in a separate window.)
- Squire.ttf – an optional decorative font that may be installed for the heading ‘Classical Vocabulary’ at the top of the program window. If this font is not installed, the heading will be displayed in the Tahoma font.
- Miscellaneous Greek.rtf and Miscellaneous Greek.vocab – a sample word list to demonstrate the program. This word list may be deleted or modified to suit your purposes. (Note that TWO files are used for each word list: the .rtf file holds the translation/note associated with the word list, and the .vocab file holds the word list itself.)
- Default1.jpg – a sample image file that can be used as a ‘splash screen’, to replace the image of Greek text that appears when the program opens. Any image file can be used, but it must be named default.jpg (not default1.jpg).
Next, install the SPIonic Greek font SPIonic_Windows.ttf which is provided in the distribution file ClassicalVocabulary21.zip, by right-
Create a shortcut to the executable file ClassicVocab.exe, or add the program to the Start button. The program is now ready to run. You can bypass any malware security warnings: the software is safe.
Running Classical Vocabulary
When run, the program searches for related sets of .rtf and .vocab files that are in the same folder as the executable file. The names of any sets found (one name per set) will be loaded in the Select / Create / Edit … Combo box. You can now select a word list (which is automatically linked to its Translation / Note) in order to work on it. If no .rtf and .vocab file sets are found, the Combo box will remain empty and you will have to create a file set.
How to …
These ‘instructions’ are only guidelines. Some users may prefer to dive straight in and work things out for themselves, and this is encouraged. However, all users are urged to read through the following notes at least once. There are one or two useful features that may otherwise go unnoticed . . .
Create a new file set (i.e. word list and associated translation / note)
- Open the Select / Create / Edit … Combo box, and click in the open blank space at the top of any other list names that may appear below it. You may be prompted to save the current file set before continuing. (At program startup you may also click directly on the Change button, while the Combo box is displaying Select / Create / Edit …. See point [3] below.)
- The Combo box will now display Select / Create / Edit … and most of the controls will become ‘greyed out’ and unavailable.
- Click the Change button at the right. The caption of the button will change to Update, and a flashing red bar will appear below the button (reminding you to click ‘Update’ when you have performed the change).
- Type a name for the new word set (e.g. Thucydides Book 7) in the Combo box.
- Select either the Greek or the Latin radio button before continuing. (Note: The only effect of this choice, is to set the appropriate font of the Word box. Select Greek for Greek authors and Latin for Latin authors.)
- Click the Update button. If an existing word set is found with the same name, a warning will be displayed. The caption of the button will revert to Change, and the flashing red bar will disappear.
- The cursor will be positioned in the Word box, and you may now start adding words and meanings / descriptions for the new word list.
Rename a file set / ‘Save As’
- Select the file set in the Select / Create / Edit … Combo box.
- Click the Change button. The caption of the button will change to Update, and a flashing red bar will appear below the button.
- Change the name of the file set. (The Combo box will now allow you to make changes.)
- Click the Update button. The caption of the button will revert to Change, and the flashing red bar will disappear.
Important: Renaming a file set creates a duplicate file set under the new name. This can be a useful way of ‘seeding’ a new file set. You may of course choose to delete the old one separately (see below).
Delete a file set
- Select the file set to be deleted in the Select / Create / Edit … Combo box.
- Click the Change button. The caption of the button will change to Update, and a flashing red bar will appear below the button.
- Remove the name of the file set from the Combo box. (The Combo box must not display anything for this file set.)
- Click the Update button.
- You will be prompted to confirm the (permanent) removal of the file set: Click ‘Yes’ or ‘Cancel’.
- The caption of this button will revert to Change, and the flashing red bar will disappear.
- The Select / Create / Edit … Combo box will be repopulated to reflect the change.
Add a new word / description set
A word can be added at any position in the list. The added word will always FOLLOW the word that currently appears in the Word box. Type the new word over the current word, together with the new meaning / description in the panel below it, and click Add (or press Ctrl+I). The word which you typed over will NOT be overwritten (it will remain in the same position in the list), and the new word will be inserted after (i.e. below) it. Click the Save button.
Note that the words are synchronised with their meanings / descriptions. BOTH must be filled in before the item as a whole can be added and saved.
Edit an existing word / description set
- Select the word / description to be edited and make the necessary change.
- Click the Save button.
Important: Click the Save button BEFORE moving to another entry, otherwise your changes will be discarded. The program does NOT save edited changes automatically.
Master list: Check for duplicate entries
A word that you wish to add to a list may already appear elsewhere, either in the same list or in another one. Click the Master List button to obtain a consolidated, alphabetised listing of ALL the vocabulary items in ALL the lists. The Greek and Latin lists are maintained separately, and the program intelligently ‘knows’ which one to open when you click this button. You can also use the shortcut Ctrl+M.
Insert Greek text: Ctrl+G and Ctrl+T
It is possible to insert Greek text directly in the Translation / Notes panel (but NOT in the Meaning / Description panel).
- Click at the position in the Translation / Notes panel where the Greek text is to be inserted.
- Press Ctrl+G to change the current font to SPIonic (Greek).
- Type the Greek text. Hint: Press Ctrl+Y (or right-
click) to display the keyboard mapping for the SPIonic font. Note that the mapping window is resizable – click any border and drag it to the required size. - Press Ctrl+T to end the SPIonic font and revert to the ‘other’ font, i.e. the font that was in effect before Ctrl+G was pressed.
Move an entry up or down in the list
It may be necessary to move an entry up or down in a list, particularly as lists are NOT sorted automatically. Click the Up or Down button, or press Ctrl+U or Ctrl+D.
Self-
Both the main program interface and the Master List have a self-
Search for a word or phrase
In the main program interface only the current word list is searched. In the Master List all the word lists are searched. Enter a search word/phrase in the Search box and click the Search button. The translation / notes is searched, and all occurrences of the word/phrase are returned, with all instances of the search text shown in red.
There are two ‘whole word’ check box options in the main program interface, one for the Meaning / Description panel, and one for the Translation / Notes panel.
If any occurrences of the searched item are found in the Translation / Notes panel, the following two additional controls will be displayed:
 The number in brackets shows the total number of occurrences found, irrespective of whether the search string represents a whole word or not (thus, a search on ‘respect’ would find both ‘respect’, ‘respectful’ and ‘disrespect’ ). Placing a ‘tick’ in the Whole word check box re-
Important: The whole word option for the Translation / Notes panel functions independently of the whole word option for the Meaning / Description panel.
Format specified text
 The formatting panel shown here allows you to apply formatting to selected text in the Translation / Notes panel (but NOT in the Meaning / Description panel). ‘B’ = Bold, ‘U’ = Underline and ‘I’ = Italic. There are keyboard shortcuts for Bold and Underline (Ctrl+B and Ctrl+U respectively), but not for Italic. The two buttons showing ‘A’ can be used to increase or decrease the font size. The font size (and name) of text in the Translation / Notes panel can be shown as a tool tip: select the text and hold the left mouse button down for a short while.
If you use the font drop-
To change red/blue/green text back to black (since there is no ‘Black’ button), select the text and click any one of the three colours twice in succession (not double-
The Copy Format button can be used to copy the format of one section of text to another section of text. (It works similarly to the Format Painter in Microsoft Office.) Do the following:
- Click on the text whose format you wish to copy (it is not necessary to select this text).
- Click the Copy Format button. The button will become ‘greyed out’.
- Use the mouse to select the text whose format you wish to change.
- When the mouse button is released, the format will be copied and the Copy Format button will become available again.
Other useful (and important) things to know
Random Quotations
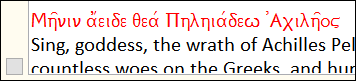
The Random Quotation window can be accessed by clicking the image which covers the Translation / Notes panel when the program opens, or via the shortcut Ctrl+Q at any time.
Keyboard shortcuts
In short, use them! The UP and DOWN cursor keys are good for scrolling quickly through the items; ESC is a quick way to get out of a search, or to show the ‘answer’ in a Test Yourself, or to cancel an ‘Add’ or ‘Remove’ operation or dialog box. The INSERT key adds a new item (but be aware that the keyboard’s insert/overwrite status will also change!). Ctrl+S saves your work. Ctrl+Y (or right-
Tool tips
There are several tool tips – ‘play’ with the program for a while to discover them all. Hover the mouse over an element for the tool tip to appear. To determine the font size and font name of text in the Translation / Notes panel, select the text with the mouse but do not release the mouse button: the font size and font name of the selected text will appear as a tool tip. When the mouse button is released the tool tip will disappear. Tool tips for the increase / decrease font size buttons work in a similar way.
Backups
Each time a word list is opened, a backup file set is created in the Backups sub-
‘Stay on top’
 The default form style for the program is ‘stay on top’, which means that the program window remains visible and in front of other windows on the desktop, even if focus is shifted to another window. You can change this behaviour to match standard Windows convention by clicking the ‘overlapping page’ icon. Click this icon again to change the form style back to ‘stay on top’.
Non-
Increase the width of the Word edit box and the Meaning / Description panel
You may wish to add longer word phrases (instead of individual words) to the word box. In such cases it is more convenient to have a larger word box. Simply double-
The width of the Meaning / Description panel can similarly be expanded through a double-
Increase the height of the Translation / Notes panel
 Click the small square button at the bottom left of the Translation / Notes panel to increase the size of this panel. All the controls in the lower part of the window will become obscured and be temporarily unavailable. This feature can be useful if you wish to work exclusively on the translation or notes. The button has a toggle function: click once to expand the panel, and click again to reduce the panel to its original size.
Splash screen / opening image
When the program first opens, the Translation / Notes panel contains an image of a few lines from a famous Greek tragedy (can you identify it?). You may replace this with an image of your choice, by copying the image to the program folder and renaming the image as default.jpg. A sample picture is provided in the distribution file ClassicalVocabulary21.zip, with the name default1.jpg. Rename default1.jpg as default.jpg, then re-
The optimum image size is 724 x 282. Or, to avoid distortion, the picture should have an aspect ratio of about 2.6:1.
Window background colour
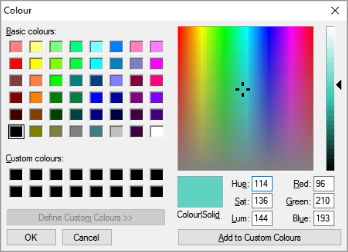 Press F7 to bring up the Colour dialog box. Use this dialog to change the background colour of any of FOUR separate windows: the Main Program window, the Random Quotation window, the Master List window and the Help window. There are 16.7 million colours to choose from! Hint: In the Colour dialog box, click ‘Define Custom Colours >>’ and use the vertical slider at the right to select a light shade: pastel colours work best. The colours are automatically saved in the Setup folder (which the program creates automatically), and these colours become the default background colours. Deleting the files in the Setup folder will remove the customisations.
Test Yourself panel colour
Press F10 to bring up the Colour dialog box to customise the colour of the Test Yourself panel. Note that this works only if the Test Yourself panel is itself visible (screenshot below). You must also be in the main program window (i.e. not in the Master list window) when you press F10. The colour customisation is, however, carried through to the Self Test panel in the Master list window.

And finally . . .
I have tried to ensure that Classical Vocabulary should be as useful and as error-
Consult the website periodically to check for program updates (compare the build number in the About window with the build number on the website), and download the updated version if required. All fixes and changes since 01 January 2016 are documented on the Classical Vocabulary ~ History page.
If you have been using the previous version of Classical Vocabulary and would like to import your ‘old’ files into the new version, please send me the files – I will happily convert them for you. You may even figure out how to do this yourself.
General advice for using the program: Heed the flashing red bar – click the Update button as soon as you have completed the change operation. Save often. Press F1 for help.
Classical Vocabulary is provided as freeware. There are no restrictions in terms of usage, no ‘nags’, no adverts, no malware of any description. If you wish to know, the program will expire at midnight on
31 Dec 4999 ;-
Enjoy using Classical Vocabulary!
Download ClassicalVocabulary21.zip (1.8 MB)
Latest program build: 24 January 2021
| Classics Apologetics |
| Edith Hamilton |
| Charlotte Higgins |
| Dorothy Sayers |
| Tracy Lee Simmons |
| Virginia Woolf |
| Greek Sayings |
| Audio Files |
| Classical Greek |
| Classical Vocabulary |
| Indexer |
| Fact |
| Arnega |
| German Irregular Verbs |
| Change History |
| Change History |
| Corrigenda |
| Change History |
| Features |
| Installation |
| Subjects and Topics |
| History |
| FAQ |
| Classics |
| English |
| Computers |
| Geography |
| History |
| Music |
| Science |
| Shakespeare |